Posts

Organic supports 0.0.1

Image
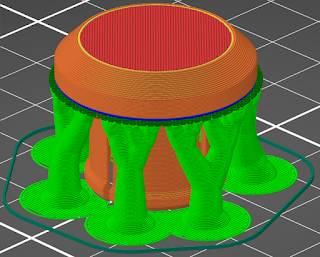
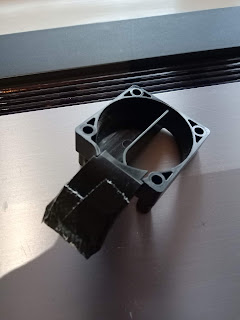
  fig1.1 PrusaSlicer 2.6.0 Beta Intro Organic supports are new for Prusa Slicer 2.6.0 Beta and are getting quite a lot of love online so I thought I'd give them a go. fig1.3 First off a copy of Prusa Slicer 2.6.0 Beta was downloaded and dumped in a folder meaning that every time I want to use it I have to go folder diving, thinking I really should make a shortcut for it (which we all know I will never do). I dialled in some custom support settings courtesy of a Reddit blog showing off some easily removed organic supports. Sadly I can't find the original post now but I did take a screen shot on my phone which you can see in fig1.2. So far, so simple. I am currently printing some motorcycle stem caps for HPE  which I was currently printing with traditional supports. I usually avoid using supports but this model needed them to print correctly. I was also using Concentric infill and a 1.0 layer height for aesthetic reasons. The results were a bit more miss than hit however. fig1.3

Printing on fabric *Work in progress*

Image
  This is a work in progress but as the blog is being written at the same time as I am working (for a change), I thought I might as well publish it to make it a live update of sorts. So do pop back in the future to see when I finally give up and set the lot on fire. To save a load of wasted effort with me explaining all of this again. Here is the Prusa blog which walks you through the process of using your printer on fabric. There is even a video linked in their blog. I decided to give this a go as I need some work t-shirts and what better way to show off my 3D printing than a 3D printed T-shirt logo? Well I can think of a few things but it is still cool. fig.01 The first step is nice and easy, simply print the frame and glue a load of magnets to it. I had the same issue as many others, with a slight shift on the upper layer on one side. One used founds adding more supports helped prevent that. Well maybe, they also swapped to PLA. Either way, mine wasn't that bad and was perfectl

Prusa i3 Mk3s - The Filament Roll call V1.1.1

Image
Intro Here are my general findings about various filaments that I have used in the Prusa i3 Mk3s. There are plenty of reviews out there, some of them are quite good, this is an unbiased view on each of the ones I have used and quite possibly more of a reminder for me than anything else.  I use PrusaSlicer for all of my slicing needs when printing with the Prusa printer. I tend to use the built in profiles which are generally bob on with the option of titivating things in the Tuning Menu. Settings have been added for reference so you can add these to your own slicer. As a general rule, first layers are 5-10 ℃  lower temperature and no fan. Images are there for examples. I haven't done benchmark tests between the different filaments as I am always modifying my machines and how I print so it wouldn't be fare. I'll leave that to Youtube influencers and the like. I have separated my Prusa i3Mk3s based filament reviews and settings from the Copymaster. This is mainly to keep thin

Goodbyeee - Copymaster 3D 300

Image
 With the arrival of the Prusa i3 mk3s it was only a matter of time till I had to let the Copymaster 3D 300 go. It's not because it is a bad printer, but it can't do anything that the Prusa cannot aside from having a larger printing volume which I have had no need for. The printer was listed for sale and quickly snapped up by a Copymaster 400 owner who fancied the smaller machine to work along side his monster. Ironically I printed a batch of Christmas baubles this week and Prusa slicer dropped into the Copymasters setting allowing me to print double the amount of baubles, well it would have if I hadn't gone and sold it anyway....

sleepy Zeds - Copymaster 3D 300

Image
I was having some real difficultiesd with getting everything flat and level with this Copymaster 3D. First the bed wasn't flat in the first place then I couldn't get a consistently level surface. Something else was up... I could get the bed perfectly level and perform a test print fine, but without even power cycling the printer, my next print would start with the printer head 1mm off the bed and spaghetti would follow. It took me far too long but when I decided to start from scratch, I spotted my Z axis was crooked. I fixed this but then it would just sag back down to its wonky original position. I have a droopy Z axis and no amount of blue pills will fix that. Fig1.1 The fix came is a pair of fairly inexpensive anti backlash bushes as pictured in fig1.1. They come in three pieces. The top and bottom mesh together with a spring in between to maintain tension on the screw. Enough tension to prevent sagging but not enough to prevent the Z axis stepper motors from doing thei

Cool Brah - Copymaster3D 300

Image
Fig 1.1 This is an uncompleted task but publishing what I figured out as it might be helpful to you. Parts cooling is an issue for the Copymaster 3D series. The printer is fighting a balance between maintaining hot end/cold eld temperature and cooling the filament rapidly enough on the printing surface so it sets. It is trying to do all of this with one ducted fan.  This design has the advantage of lowering the weight of an already heavy printer head but it makes printing rather tricky. I would often be compromising by running a temperature too low in order to reduce stringing and promote bed adhesion by running the bed clearance lower on first layers (compounded heavily by other issues too. My first modification avenue was to try modifying the ducting for the existing fan. I first mocked this out with tape to further aim air across the print but this did nothing but cause obstructions. A ring or viper type duct would be nice but clearance under the head is next to impossible so I was

Spitfire

Image
Some of you may have noticed a sad looking Guillows balsa and paper Supermarine Spitfire sat on the worktop by my printer. I built this after I broke my heel in a motorcycle accident with my then step doughter Isabella when she was a toddler. Over the years it has collected a fair few curious finger holes, plenty of dust/ spider poops from storage in my mums garage and damage from moving about. As it has a fair few fond memories atached to it I decided to give her a little tidy up so she looked a bit less sorry for herself. Seeing as I have a nice 3D printer, why not print some bits out myself? Undercarriage The wire undercarriage had collapsed a long time ago. The string holding it in place had slipped and the surrounding paper was damaged. I could have just repaired this as the white painted balsa doors still looked okay but where is the fun in that? I found some m ain gear by Ocminimotto  on Thingaverse for a Hurricane. These would work well enugh and would just need swap