Posts

Showing posts from November, 2020

sleepy Zeds - Copymaster 3D 300

Image
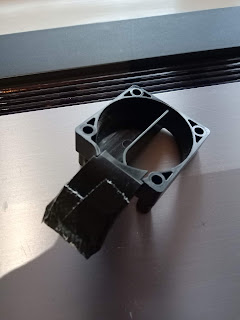
I was having some real difficultiesd with getting everything flat and level with this Copymaster 3D. First the bed wasn't flat in the first place then I couldn't get a consistently level surface. Something else was up... I could get the bed perfectly level and perform a test print fine, but without even power cycling the printer, my next print would start with the printer head 1mm off the bed and spaghetti would follow. It took me far too long but when I decided to start from scratch, I spotted my Z axis was crooked. I fixed this but then it would just sag back down to its wonky original position. I have a droopy Z axis and no amount of blue pills will fix that. Fig1.1 The fix came is a pair of fairly inexpensive anti backlash bushes as pictured in fig1.1. They come in three pieces. The top and bottom mesh together with a spring in between to maintain tension on the screw. Enough tension to prevent sagging but not enough to prevent the Z axis stepper motors from doing thei

Cool Brah - Copymaster3D 300

Image
Fig 1.1 This is an uncompleted task but publishing what I figured out as it might be helpful to you. Parts cooling is an issue for the Copymaster 3D series. The printer is fighting a balance between maintaining hot end/cold eld temperature and cooling the filament rapidly enough on the printing surface so it sets. It is trying to do all of this with one ducted fan.  This design has the advantage of lowering the weight of an already heavy printer head but it makes printing rather tricky. I would often be compromising by running a temperature too low in order to reduce stringing and promote bed adhesion by running the bed clearance lower on first layers (compounded heavily by other issues too. My first modification avenue was to try modifying the ducting for the existing fan. I first mocked this out with tape to further aim air across the print but this did nothing but cause obstructions. A ring or viper type duct would be nice but clearance under the head is next to impossible so I was

Spitfire

Image
Some of you may have noticed a sad looking Guillows balsa and paper Supermarine Spitfire sat on the worktop by my printer. I built this after I broke my heel in a motorcycle accident with my then step doughter Isabella when she was a toddler. Over the years it has collected a fair few curious finger holes, plenty of dust/ spider poops from storage in my mums garage and damage from moving about. As it has a fair few fond memories atached to it I decided to give her a little tidy up so she looked a bit less sorry for herself. Seeing as I have a nice 3D printer, why not print some bits out myself? Undercarriage The wire undercarriage had collapsed a long time ago. The string holding it in place had slipped and the surrounding paper was damaged. I could have just repaired this as the white painted balsa doors still looked okay but where is the fun in that? I found some m ain gear by Ocminimotto  on Thingaverse for a Hurricane. These would work well enugh and would just need swap