 |
| fig1.1 PrusaSlicer 2.6.0 Beta |
Intro
Organic supports are new for Prusa Slicer 2.6.0 Beta and are getting quite a lot of love online so I thought I'd give them a go.
 |
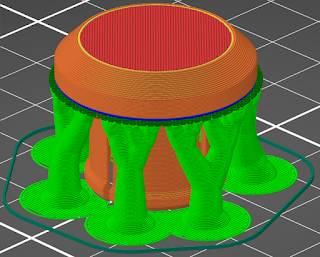
| fig1.3 |
First off a copy of Prusa Slicer 2.6.0 Beta was downloaded and dumped in a folder meaning that every time I want to use it I have to go folder diving, thinking I really should make a shortcut for it (which we all know I will never do). I dialled in some custom support settings courtesy of a Reddit blog showing off some easily removed organic supports. Sadly I can't find the original post now but I did take a screen shot on my phone which you can see in fig1.2.
So far, so simple.
I am currently printing some motorcycle stem caps for HPE which I was currently printing with traditional supports. I usually avoid using supports but this model needed them to print correctly. I was also using Concentric infill and a 1.0 layer height for aesthetic reasons. The results were a bit more miss than hit however.
 |
| fig1.3 Something strange going on |
Initially I couldn't get good bed adhesion so needed to add a brim then when I did start getting successful prints I was getting supports which were hard to remove and burn filament getting deposited into the print as you can see on the left of fig1.3.
As I needed a stem cap for a sale I had made, I quickly spat out a good one by returning to traditional supports, Rectilinear infill and increasing layer from 1.0 to 2.0 which resulted in the model on the right of fig1.3.
I went to Reddit with the hope to bounce some ideas around or alt least waffle to myself much the same as I do on here. Then I went to work trying to figure out what I was doing wrong.
Trouble shooting
The way I see it is I have 2 problems with this pring which may or may not be related:
- Supports not acting the way I would like
- burnt filament getting deposited into the model.
There were a few culprets which would cause one or both of these issues with their solutions soon to follow:
- hot end dragging up filament.
- stringing.
- low quality/damp filament.
- Poor support setup.
- Organic supports not being suitable in this instance.
- Z calibration.
Hot end Dragging up filament
As you may have noticed in the intro, I had increased layer height and changed the infill type as a quick combat for this issue. Ironically I know that rectilinear infill can actually cause filament to drag as the paths cross but reducing the need for retract and move inside the model; reduced oozing potential which could have lead to the hot end picking this up. Also the increased layer height reduces how low the nozzle is to the model which increases the danger of the hot end finding stuff to pick up, burn and deposit into the model. More to the point; these were a known working setting which might fix the issue short term and get a model printed there and then.
There are other causes for dragging filament but these relater else where so we can leave it at this for now.
Stringing
Looking at the supports themselves, you can see a lot of stringing. This leads to unwanted adhesion where the strings tie to the model and also offer the risk of being picked up and melted to the hotend. As I am printing with PETg, I expect some stringing but there are ways to reduce this.
I printed some retraction calibration towers with the help of this superb tool offered by TeachingTech. This proved that my printer was pretty well setup, with a few small adjustments to reduce the "zits" associated with light stringing. This means I had another issue on these support moves and it might be in the finer setting of my slicer. On very short moves, the printer does not retract and move to save time. This means the hot end is free to ooze during the fast move which leads to heavy stringing. This normally isn't an issue but could be an avenue to go down should I wish to pursue organic supports for this model.
Two fixes here would be to:
- Lower the "Minimum travel after retraction" setting to below 1mm.
- Enable "Avoid crossing perimeters" to help tidy these instances up.
Testing
 |
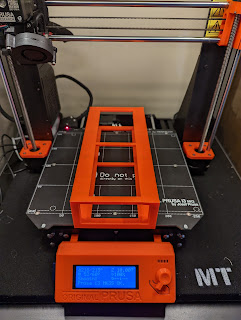
| fig 3.1 as printed |
On this print (fig3.1) I used default PETg setting with Top contact Z distance set to 0.2 (detachable). The filament was a recently dried roll of Prusa PETg black and the model is a slightly taller stem cap which gives a very different support profile to those seen in fig 1.3.Due to being black, it is not possible to see any burnt filament in the model. Apart from start and end point slight under/over extrusion, there is no evidence of anything odd going on in the model itself.
The supports show a lot of stringing despite their wider spacing. This is no different to the inside of the model so Enable "Avoid crossing perimeters" could have been helpful here. The supports do not break away from the overhang especially easily. This is most likely due to the cupped underside of this model so any support would be a pain here. However, with the main support broken away at the outer lip, the inner small supports were quickly dredged out with some long nose pliers. As this is an area not visible when the model has been fit to the motorcycle, this is adequate and completed in around a minute to that standard seen if fig3.2. I'd deem this as an improvement over printing the model upside down (with a small support needed for the taper) as the upper surface finish is improved for a small cost in time and additional filament used.
 |
| fig3.2 after minimal post processing. |


Comments
Post a Comment