protecting key workers diary 25/05/20
Please maintain a minimum of 2 metres spacing whilst reading this blog entry. The use of PPE is not mandatory, but it is compulsory.
If you are reading about this in the future you have probably already figured out that this is a COVID19 based blog entry and already suffered all of the associated flash backs, checked the bread bin and counted all of the loo rolls again. Still 42, you are okay.
I have decided to join thousands of others lucky enough to own a 3D printer in producing frames for face shields to help protect key workers. The UK has done a pretty crap job of supplying key workers with PPE (in fairness not many countries did) and very early on this was recognised as a huge issue that the 3D printing community stepped in to help fill the gap.
If this is all somehow news to you then you can join in on the help by printing your own Prusa face shield frames. You can then either get the rest of the ingredients and make your own face shields or joining a group such as 3DCrowd for the UK which I am a part of.
I will update this one periodically where I find something of relevant interest to say.
01/04/20
I was a bit sceptical at first, wondering if it was a bit like the blitz when everyone scrapped their metal railings and pots to help the war effort despite the metal being useless. It soon proved to be a real need so I got busy helping out.

I first went looking for a local group, when I couldn't find one I found a UK wide group called 3DCrowd.
They were producing face shields based on the Prusa design frames whereby you, the guy with the 3D printer, produced frames, shipped them to a depot and then they added a visor and a head band before shipping them on to the party in need. These frames should be ideally printed in PET-G for its hygiene properties but PLA can also be used.
They also have a go fund me going which at first made me wonder if they were trying to profit off of this but in the end I decided they were on the level. I was aware that there were more efficient frames out there than the Prusa design but its apparent better comfort and the groups needs made this decission for me.
I made an initial test print of a Prusa mk1 frame in my finest gold (custard) which came out well but took forever to print and the lower frame piece lifted during printing. I printed a second in draft quality and some z stop setting change had it on point.
 |
| I saved the other one, this one was toast. |
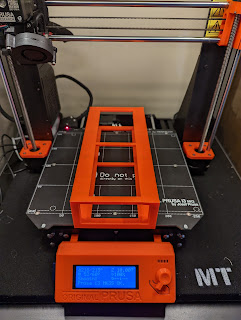
I then realised I was supposed to be printing the much bigger Prusa mk3 with a 3 layer wall thickness and 20% infill. I set the bed up to have two frames and two bottom pieces sat inside them with the correct settings and hit print.
For some weird reason Cura stuck random layers of crap infill in the visor body which made a complete mess. There were two mk3 files and when I changed to the other one, this issue went away thankfully.
Printing was taking about 12 hours for two full face shield frames which is a long time, I might not be making a huge amount of these!
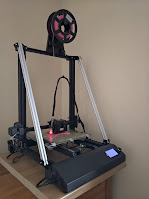
 With the amount of time to print in mind; I worked to try and make the most of the Copymaster 3D's 300/300/400mm printing bed. Prusa had come up with a stack but hadn't shared an .STL yet so I was stuck with as many frames as I could get on the surface.
One thing not being stuck though was my prints. I hadn't really ventured to the extremes of my printing bed yet and its hopelessly wobbly surface was now a huge problem. Technology outlet were not interested in helping so I did my best to make the most of what I had.
I found the full x axis was mostly okay and spread what I could in this area. Unfortunately I was having issues with the extremes of the sliced file trying to print further than the printer would let it (a Cura setup issue I think) and bed adhesion was just painful to get started. When it started right, I was golden but this was rare. The only successful start on the right, was cut short by a power cut which the print didn't recover from. I don't know if print recovery has worked properly once for me yet.

07/04/20
Then Prusa released the .STL file for stacked printing and things got a fair bit easier, printing 4 at a time.
At about the same time I dropped the quality of prints down again to 0.3mm layer height for more speed and removed the visor bottoms from the printer bed. This sped things up a touch more and allowed me to print visor bottoms in a separate batch that could use up the end of a roll of filament in a 3 hour print.
I tried to get 8 frames at a time to go but it was proving hard enough to get 4 to stick. This was especially true at evening change overs (prints were around 16 hours for 4 frames) when I would spend many tired minutes trying to get the z stop right for however the printer was feeling at that second in time. Very frustrating indeed!
 This all came to a head one night when I turned the printer off mid spaghetti spewing and went to bed for the second night running. I got my phone out and bought a Prusa i3 mk3. watch this space for that one showing up...
 Despite setbacks I was slowly churning out a fair few frames in the variety of colours I had kicking about the house. I stuck in orders for more filament along the way, mostly for PET-G but also for PLA when it came up cheap, this is not the cheapest thing to do afterall.
I had to get myself back to work soon after two weeks isolation so what I had was bagged up and boxed ready to ship to the depot. I just missed the big printing weekend so decided to hang on for the next opportunity.
 10/04/20
Finally, pissed off enough with endlessly resetting the Z offset by so much I decided to have another bash at sorting it. I stuck a DTI on the side of the printer head and measured the whole printing surface for undulations. The surface itself was returned to the original magnetic plastic surface. This was firstly as a desperate measure to see if this made anything better but it also conformed more to the shape of the printing bed so giving a more true representation than the glass would. I then levelled the Z axis to the frame and did the same again. then I set the bed level to bring as much of it to 0 as possible then finally stuck a bit more tape directly to the deck to level that off a bit more.
 |
| oooo that is a nice frame sneaky peak... |
I was still having to change the z offset a lot but not by quite so much nor as often. A copious amount of pritt-stick seems to help things out and I was now printing 8 frames at a time pretty consistently.
 They take about 26 hours to print which is a slightly annoying time and their finish isn't super but they are solid enough for the job they need to do.
I have noticed fairly consistent artefacts in the surface which seems to be down to the very random way that Cura has sliced this item up, placing short lines here and there often when it could be taking longer single line trips. I might be tempted to try a different slicer in future.
15/04/20
A chance encounter of some Facebook arguing over the governments PPE supply issues saw an order for 20 full face shields drop on me.
 |
| That is a clean hand honest |
First off I took to the Prusa design website and had a look at their visor design drawing. I then sketched this out on a sheet of A4. I chose A4, despite not fully conforming to the correct dimensions, as this is the same dimensions of the plastic I have available. The design does not fit in portrait so I would have to square off a landscape orientation. I used a hole punch for the holes which was very time consuming and not very accurate. The holes are supposed to be oval in shape though, so accuracy wasn't a huge issue. Except for that top fella, don't wary about that top fella...

Once I was happy with the hole locations, I transferred them onto the separating card of the transparency pack and taped together 10 sheets between two card sheets before tottering off to the shed.
 I used the pillar drill set to its highest rpm with a 5.5mm drill bit (see drawing for dimensions in case they change) then cut the radius and excess of with a scalpel.
Naturally they didn't fit properly with the outer holes slightly too close so I cut them out too. One or two were then too loose so glue was needed but I soon got the hang of it and visors started clipping onto frames rapidly.
All of the frames needed a little bit of tidying up with a bit of stringing and some random artefacts that mostly effected the bottom pieces closing up slightly especially on the rainbow PLA.
 Happy I hadn't completely burked up the first 10, I cut the rest of the plastic sheet in much the same way although being a stack of 40 this time, I used a jigsaw for the radii which didn't end in tears surprisingly.
 Next up I raided my mums supply of elastic. I cut these to 220mm lengths and cut a 12mm slit a bit shy of each end to thread onto the ends of the frames . This worked great with the 15mm ribbon as shown as well as 6mm which saves a lot of material wasted when tying.
Before long I had a decent stack of completed face shields ready to drop off at Coningsby surgery where they were greatly appreciated. It was nice to help a local group of key workers and I now know I can do batches like this without issue so I may be able to do more in the future. For now it is back to printing frames for our new regional hub whilst getting rocked to sleep by the sound of my Copymaster 3D slowly eating itself.

06/05/20
With several kilos of PLA going through the printer and frames delivered as a result, the last few weeks have been productive if uneventful.
Print quality has been gradually reducing (or I am getting more picky) and a few attempts to combat this have had very minimal results.
 Obviously this is the ideal time to move to printing in PETg. PET is the preffered material for these frames for hygene reasons so I ordered a stack of Prusas PPE grade PETg and later a couple of rolls of SUNLU PETg whilst I waited for Prusa to get thier shipment out.
Withmy PLA stock dwindling I was keen to move over to the better filament.
 Initially I did get the first lot of prints to go with a little fuss at the beginning. It was clear however that the stringing was really bad, prints were under extruded and generally messy. I had 6 printed when I decided to take a time out and sort the printer out. I spent time making sure that my extrusion was set correctly and cleaned the bed back to glass and started layering glue again.
  As a result my prints were substantially worse. I wasted hours starting and restarting prints for them to fail on the first layer. Nothing would stick and the printer was now making quite a racket.
I decided to strip and clean the whole printer to find out where the grinding noise was coming from. I did find a few rollers were incorrectly aligned, the filament low run out detector had broken (easy fix and explains why I wasn't getting anything from it) and the silicone boot had slipped partially blocking the fan but otherwise the printer wasn't too bad considering the work it was doing. I changed settings to reduce print speed whilst increasing temperatures everywhere. Another long bed levelling exercise later and it was time for bed so I left the printer doing its thing. In the morning I was thanked for my efforts with the failed print on the left.

 After a clean up I lifted the print surface and layered more tape till I had a more flat surface. At least within 0.1mm across all four corners. I then swapped from the white SUNLU to the bright orange Prusa filament. I also changed a few settings to improve my chances of bed adhesion. One false start later and I had a tidy looking first layer down so I left it to do its now very slow thing.
At least I still have quite a few PLA frames to deliver...
13/05/20
The printer did successfully print the stack of Prusa PETg frames but it wasn't the Copymaster 3D's best effort. I finally gave in and admitted it really wasn't cut out to print PETg despite showing early promise.
 As a result I demoted it back to PLA printing. On the plus side this was a fair bit faster than the settings I had to run for PETg. The down side of this is that I hadn't bought any more PLA so I got myself onto eBay where there was cock all available at a sensible price. Balls.
 Thankfully www.3Djake.co.uk has a good range with a fair few on offer so I ordered a few kilos and went digging though my part used rolls of filament for something useful. I was down to scraps but i was at least around to swap filament when needed. only the Technology outlet 250g red roll that came with the printer was feeling a bit hard and old but even that printed after an initial blockage.
 |
| Tosser! |
In the morning I was greeted by a 300g blob of said filament in and around my printers hot end. More balls.
I had to laugh. I suppose the box containing a Prusa i3 mk3 on my kitchen side helped lighten my mood. I spent the morning building that then once the Prusa was working on test prints I sorted out the mess that was the Copymasters hot end. It wasn't that bad save for a split silicone boot and an hour later it was back in one piece battling me to put down a first layer again.
Meanwhile the Prusa was fully up and running. The Prusa PPE PETg filament needs a fair bit more flow rate and likes to print hot likes its higher tolerance Prusament sister. Once this was dialled in; I was knocking out 8 frames and bottom reinforcements in 11 hours 45 minutes. Compare that to the Copymanster 3D's 34hr+ to print an 8 frame stack and there is just no contest.
 |
| Player 2 has entered the game |

I sit hear typing this with an eerie silence about the house.
The 3Dcrowd group has met its demands for now and are working through their stock before we produce any more frames.
Up until now both printers have been working hard producing frames at an impressive rate.
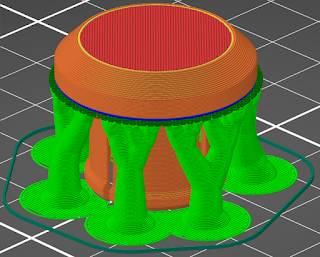
 The Copymaster 3D 300 was not about to be outdone by the Prusa i3 mk3s. A new sliced profile was made to make best user of the build surface available. I managed to squeeze in 16 frames and bottom supports with a little room to spare. In fact I still had quite a bit of room to go up but this was about the maximum number for complete frame sets. It was also a bit shy of 1kg of filament per go over about 2 and a half days printing.
 This was surprisingly efficient as where the Prusa would stop and start every 11 hours 45 mins, the Copymaster kept plodding on. This was very evident when printing around work where the Prusa may sit idle for hours whilst the Copymaster turtle caught it up. For this pictured print I used the bundled Prusa PLA which is noticeably very strong. I really struggled to get some of the supports off and the frames feel really sturdy.
A real turtle and hare story. The hare still won but at the least the turtle didn't completely embarrass itself.
 |
| The last 44 frames ready for delivery? For now at least. |
A final footnote:
If you want to support or join in on this cause you can head to 3DCrowd who have a go fund me page linked on their site and support our efforts too with a £1 for every print from your donations. Or there may be a group in your country too if you are outside of the UK.
If you want to donate directly to my own effort you can get in contact or just use paypal gavin.heggs@hotmail.com .
Thank you for any support you can give, with a frame costing around £2-3 each to produce, the costs do add up.
Comments
Post a Comment