Ghost busters
Intro
Ghosts were plaguing my builds and needed scaring off.
I started this a while ago but never got round to publishing this as I was never quite done. I will update this one if I make any further progress.
I started this a while ago but never got round to publishing this as I was never quite done. I will update this one if I make any further progress.
Let's just get down to how I cleared out my spooky pest problem.
Tightening things up
Desk

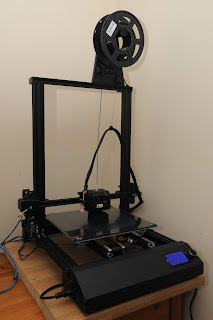
 The desk the printer was on, made for a wobbly base so this was the first thing I changed.
I will look to make a proper stand and enclosure for it in the future but for now this far sturdier chest of drawers in the spare room will do nicely.
I added some kitchen work surface to add a bit of dampening and to allow the printer to be oriented forwards.
This looks better but as the drawers are more stable in the X axis now, the heavier y axis (glass bed is not helpeing this) does get things rocking a bit with faster movements.
Belts
The belts on my printer weren't as tight as they could be so I loosened the x and y pulleys, held them in a tighter position and tightened them back up. One thing to watch out for here is that the little captive nuts are crap and strip very easily so don't over tighten them.
The Y axis wasn't very tight still so I added an Ultimaker belt tensioner to the underside right next to where it connects to the bed which took up a load of slack.
I tightened the X axis too which made a noticable difference to ghosting but in hindsight, this might be a touch too tight as the rubber wheels have started to rain ruber down onto the printing bed.
The Z axis being a screw and the way the printer works, doesn't have any ghosting issues so that's the belts done.
Belting!
Chassis
 The chassis is made of 20x20 aluminium extrusion with some doublers in key areas for extra rigidity. L brackets hold it all together and it is generally, pretty sturdy.
I tightened things up where I could but this made little difference. One fastener was crossed from the factory so I made a note to replace this one at a later date.
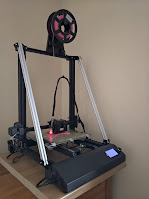
The Z axis has no bracing and I spotted someone had made some nice brackets for a Copymaster3D 500 . I measured things up and ordered two 800mm long sections of 20x20 extrusion and some more nuts from ebay. The M4x10mm bolts came from Lincolnshire fasteners as I knew they were good quality and well priced.
Once everything had turned up, it all sat in a pile, tucked out of sight, for a couple of months when I remembered I had intended to make this modification.
 The job was pretty easy. I bolted on the Sunlu PLA based brackets onto the frame then offered up a bar of ally to measure it for cutting. Both ends were cut at the required angle with a hack saw and wire wheeled to remove burrs. A quick check that I hadn't made a pigs ear of it later and I did the same to the other bar. Then, with the nuts and bolts already in the brackets, I just slotted the top in then dropped the other end of the bar down into the bottom and tightened everything up.
 I later ended up swapping out some bolts as I had ordered a range of sizes but only needed 10mm long bolts but otherwise the job was done and my printer now looked pretty hench!
 The printer was operating fine at the time of doing this mod, I was printing 4 stacks of Prusa Mk3 face shields at the time, but whilst sorting out the never ending Z offset issue I noticed I had a new Z upper limit which had dropped my upper limit by about 30mm which wasn't the end of the worlds but a bit disappointing.
Substantially lower however; I still couldn't hit the X stop which really upset my printer when I attempted to zero. This is near 100mm down from the top of the gantry which is a big problem for printing large items.
In reality however, I will be unlikely to be printing to this volume size and needing to have the X so far across on the build plate so I have only lost about 30mm really. It is a pain that my volume has been eaten into but in reality, I don't see myself hitting this very often, if ever.
Once everything had turned up, it all sat in a pile, tucked out of sight, for a couple of months when I remembered I had intended to make this modification.
 The job was pretty easy. I bolted on the Sunlu PLA based brackets onto the frame then offered up a bar of ally to measure it for cutting. Both ends were cut at the required angle with a hack saw and wire wheeled to remove burrs. A quick check that I hadn't made a pigs ear of it later and I did the same to the other bar. Then, with the nuts and bolts already in the brackets, I just slotted the top in then dropped the other end of the bar down into the bottom and tightened everything up.
 I later ended up swapping out some bolts as I had ordered a range of sizes but only needed 10mm long bolts but otherwise the job was done and my printer now looked pretty hench!
 The printer was operating fine at the time of doing this mod, I was printing 4 stacks of Prusa Mk3 face shields at the time, but whilst sorting out the never ending Z offset issue I noticed I had a new Z upper limit which had dropped my upper limit by about 30mm which wasn't the end of the worlds but a bit disappointing.
Substantially lower however; I still couldn't hit the X stop which really upset my printer when I attempted to zero. This is near 100mm down from the top of the gantry which is a big problem for printing large items.
In reality however, I will be unlikely to be printing to this volume size and needing to have the X so far across on the build plate so I have only lost about 30mm really. It is a pain that my volume has been eaten into but in reality, I don't see myself hitting this very often, if ever.
Ghosting removal
Makers muse have a good video that talks through ghosting removal using some slicers changes and testing. I won't bother trying to explain it here as he does a very good job.
Linear Advance
Another improvement with ghosting can be found with Linear progression setting.
Again I could go over this but there are some great videos out there like this one.


Comments
Post a Comment