I've got no strings on me - Copymaster3D 300
Intro
The one thing the Copymaster3D was good at was not really stringing at all.
But then, out of the blue it started.
After some perfect prints, a test piece showed heavy stringing whilst chasing a different problem. This was a bit disappointing so I decided to sort this out.
It was during these tests, which none of them were completely removing the stringing, I watched what the printer head was doing. The printer head draws the inner and outer wall of each column then flicks in before rising and moving across to the other column. When the printer head moves up, the nozzle lifts a Little cone of plastic like cake icing then drags a strand out as it moves across.
Why strings?
Stringing normally occurs because of residual pressure in the head, allowing some melted plastic to ooze out whilst it transits to do another thing. If you are printing a fairly blocky thing that doesn't require the nozzle to stop and transit a lot, you may not even get any hence why I hadn't seen this problem start initially.

Now as I had been buggering about with things of late I first tried testing if things I had plaid with were causing the issue.
The first test on the left was the second thing I printed after a stepped test brick which had come out fairly well.
 The black one on the right here is what the printer spat out without me changing anything as a base line. As you can see there is lots of stringing on the over hang tests which have themselves started to fail above 40 degrees on the right. Otherwise everything looks similar to that first test save for some improvements in ghosting.
 Seeing as the overhangs were struggling more so than before; I wondered if I was printing at too high a temperature. I dropped the head temp from 220 to 190 and bed temp from 60 to 40 degrees Centigrade.
The result was a noticeable improvement in overhang performance and a drop in stringing. It hadn't solved the problem but it had calmed down a bit. This wasn't the cause so I moved on.

Base line
Now as I had been buggering about with things of late I first tried testing if things I had plaid with were causing the issue.
The first test on the left was the second thing I printed after a stepped test brick which had come out fairly well.
 The black one on the right here is what the printer spat out without me changing anything as a base line. As you can see there is lots of stringing on the over hang tests which have themselves started to fail above 40 degrees on the right. Otherwise everything looks similar to that first test save for some improvements in ghosting.
Blame the PLA?
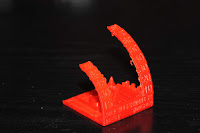
The first thing I changed was to test the Sunlu PLA I was using. I printed the same test piece with the same settings using the technology outlet red that the printer came with. As you can see the result are very similar. When I popped into the room to check on it and saw the similarity, I stopped the test early hence why it is cut off. Seeing as the overhangs were struggling more so than before; I wondered if I was printing at too high a temperature. I dropped the head temp from 220 to 190 and bed temp from 60 to 40 degrees Centigrade.
The result was a noticeable improvement in overhang performance and a drop in stringing. It hadn't solved the problem but it had calmed down a bit. This wasn't the cause so I moved on.
Retraction
You can help stop this problem with retraction which is a setting in the slicing software. I use Cura so it is under material for me. Mine was set to on and to retract by 3mm at 25mm/s as the manufacturer suggested.
I now switch out to a popular stringing test and focused on this for seeing what changes I could make.
My first attempt to solve this was to increase the distance and speed of retraction to get the plastic away from the nozzle as far and as quickly as possible.
That didn't fix anything so I did some reading and saw that direct feeding extruders like mine only really need 1mm of retraction but a bit of experimenting could well find my printers happy place.
I took photographs as I worked for comparisons but Christ knows what I did with them. I thought I lost them but what I actually did was upload them to Google then delete them from my computer. So if you are late in coming here, here it is with pictures unlike the original version.
 |
|
 |
|
 |
|
 |
|
1mm looked a lot better but it could have been a fluke and now I get the chance to fine tune so I tested either side.
It was during these tests, which none of them were completely removing the stringing, I watched what the printer head was doing. The printer head draws the inner and outer wall of each column then flicks in before rising and moving across to the other column. When the printer head moves up, the nozzle lifts a Little cone of plastic like cake icing then drags a strand out as it moves across.
That was my eureka moment: I had Z hop on and it was causing this mess.
It was Z hop
I had turned Z hop on as; during some prints the head would transit across a flat surface and iron a line into it making it look messy. I turned this off and printed the 1.5mm retracted test again. It was perfect. I tried again at the recommended 3mm which was arguably worse with little dots where it pulled away but less is more so I went with 1.5mm.
Problem solved!
It would have been nice to show you the stringing tests themselves first time round but you have then now. Seeing as the test pieces got used for welding material when making this propeller below, I wasn't taking more. It did print out rather nicely though. Let's see if you can figure out what it will be going on.
It would have been nice to show you the stringing tests themselves first time round but you have then now. Seeing as the test pieces got used for welding material when making this propeller below, I wasn't taking more. It did print out rather nicely though. Let's see if you can figure out what it will be going on.


Comments
Post a Comment